Dewinterizing a Travel Trailer
Get ready for camping season. Step one is dewinterizing so your water lines are ready. We’ll show you how in our easy guide to dewinterizing a travel trailer.
In the fall, you may have put pink RV antifreeze in your water lines to prevent damage from freezing temperatures. We showed you How to Winterize a Camper in 5 Easy Steps.
In the Spring, it’s time to get ready for camping season. You’ll want all the lines cleared so that you can use the kitchen, bathroom, outside shower, and any other water faucets you may have. There are three easy steps to dewinterizing a travel trailer.
You can follow along as we demonstrate the process in our Dewinterizing a Travel Trailer video.

Step One: Connect Freshwater Hose
You’ll need fresh water to clear the lines. The easiest way to ensure you have enough water is to connect your camper’s freshwater hose. However, if you don’t have access to a spigot to connect the hose, you can fill the camper’s freshwater tank and use that as a source of water.

Step Two: Run Water to Every Faucet
Run water through every faucet to ensure all antifreeze has been cleared. You need to open both the hot and cold sides of each faucet. It’s best to open hot first until the water is clear and smells fresh. Then, turn off the hot faucet and repeat for the cold side.

Remember to run water to every faucet. Don’t forget to do the shower, toilet, and outside shower or sprayer if you have one.
Step Three: Change Diverter to Normal Operation
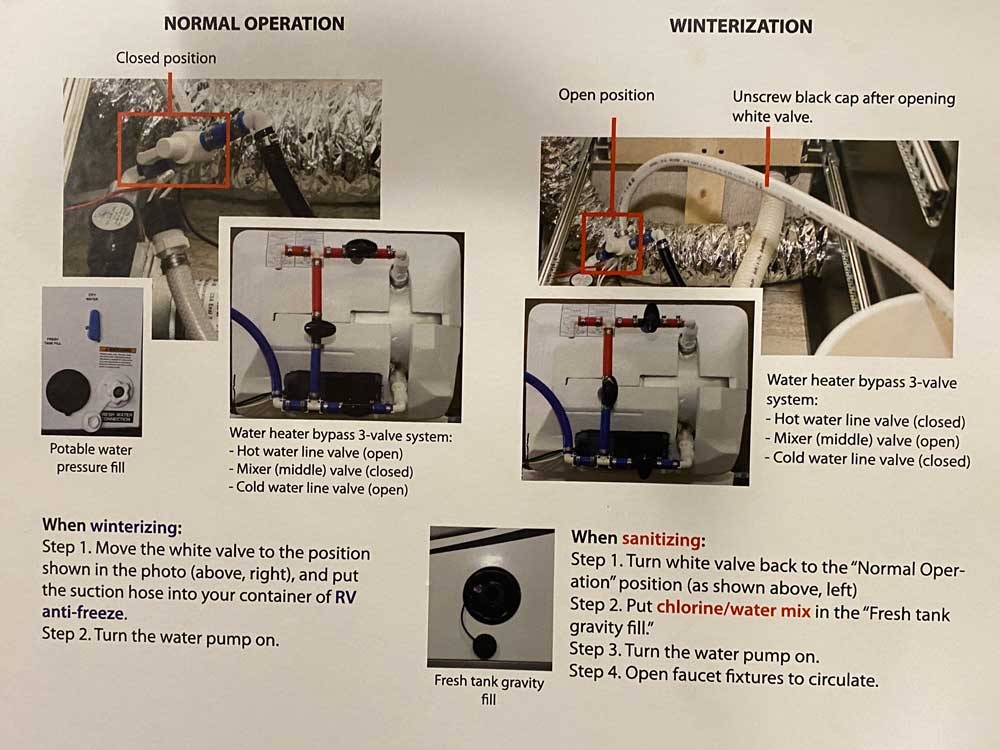
In the fall, you may have set the water lines to bypass the water heater. That way, you could drain the heater rather than filling it up with antifreeze. Now that the water lines are clear, it’s time to change the water lines back to normal operations.
Locate your water heater diverter valves. These might be located behind a panel, in a cabinet, or even under a bed.
Change the valves. There should be three valves to switch. The first splits the hot and cold water lines. The other two enable water to flow to the water heater. Check the instruction manual for your RV as needed to identify how the valves should be set. For ours, the instructions are provided on a panel that covers the water bypass diverter valves.
Recommended Next Steps After Dewinterizing
Once you have dewinterized your travel trailer, there are likely other things you need to do in preparation for the start of camping season. Here are some recommended next steps.
- Descale the water heater. Scale can build up in the water heater, preventing it from working effectively. Consider descaling the water heater using a 50-50 mix of vinegar and water.
- Sanitize the water lines. Sanitizing the lines with a diluted bleach solution helps ensure you have clean and safe water.
- Get a new freshwater hose and water filter.
- Clean and seal your RV roof.
- Clean the RV inside and out.
- Clean the air conditioner filter.
- Check the battery.
- Check tires condition and tire pressure. Get new trailer tires if needed.
- Install new smoke alarm batteries.
Thank You
Thanks for checking out our easy guide to dewinterizing a travel trailer. Hopefully it was helpful. Do you have additional tips you’d like to share to make the process easier? We’d love to hear them. Please leave a comment. Thank you.
Copyright 2021 Travel Trail Sail. All Rights Reserved.